Onboarding Your First Partner in 30 Days: A Practical Guide
Who this is for: Product, platform, and security engineers taking an API from concept to a production‑grade partner onboarding in a month.
Partner onboarding stalls when security, policy and delivery teams juggle emails, secrets, and ad‑hoc scripts. This practical guide shows secure an API and make it ready for partner integration in 30 days.
You’ll expose the API through a gateway, enable access control with a policy Lambda, configure a trust framework, and terminate mTLS at the edge (or via NGINX). You’ll design scopes and roles aligned to resources, enable client registration—including OpenID Connect Federation—wire OAuth 2.0 flows, and test the end‑to‑end path. Expect concrete steps, configs and checklists you can lift as‑is, plus pitfalls and guardrails from real projects.
In 30 days, you’ll deliver:
-
A public, stable API endpoint exposed through an API gateway.
-
Mutual TLS (mTLS) at the edge and certificate‑bound tokens (or DPoP) for sender‑constrained access.
-
Role & scope model aligned to your resources.
-
Client registration (federation or dynamic client) and OAuth 2.0 flows wired to your Authorization Server (AS).
-
A policy enforcement function (Lambda/edge) applying ABAC/RBAC to every request.
-
A repeatable test plan and operational runbook.
Week-by-Week Outcome Plan
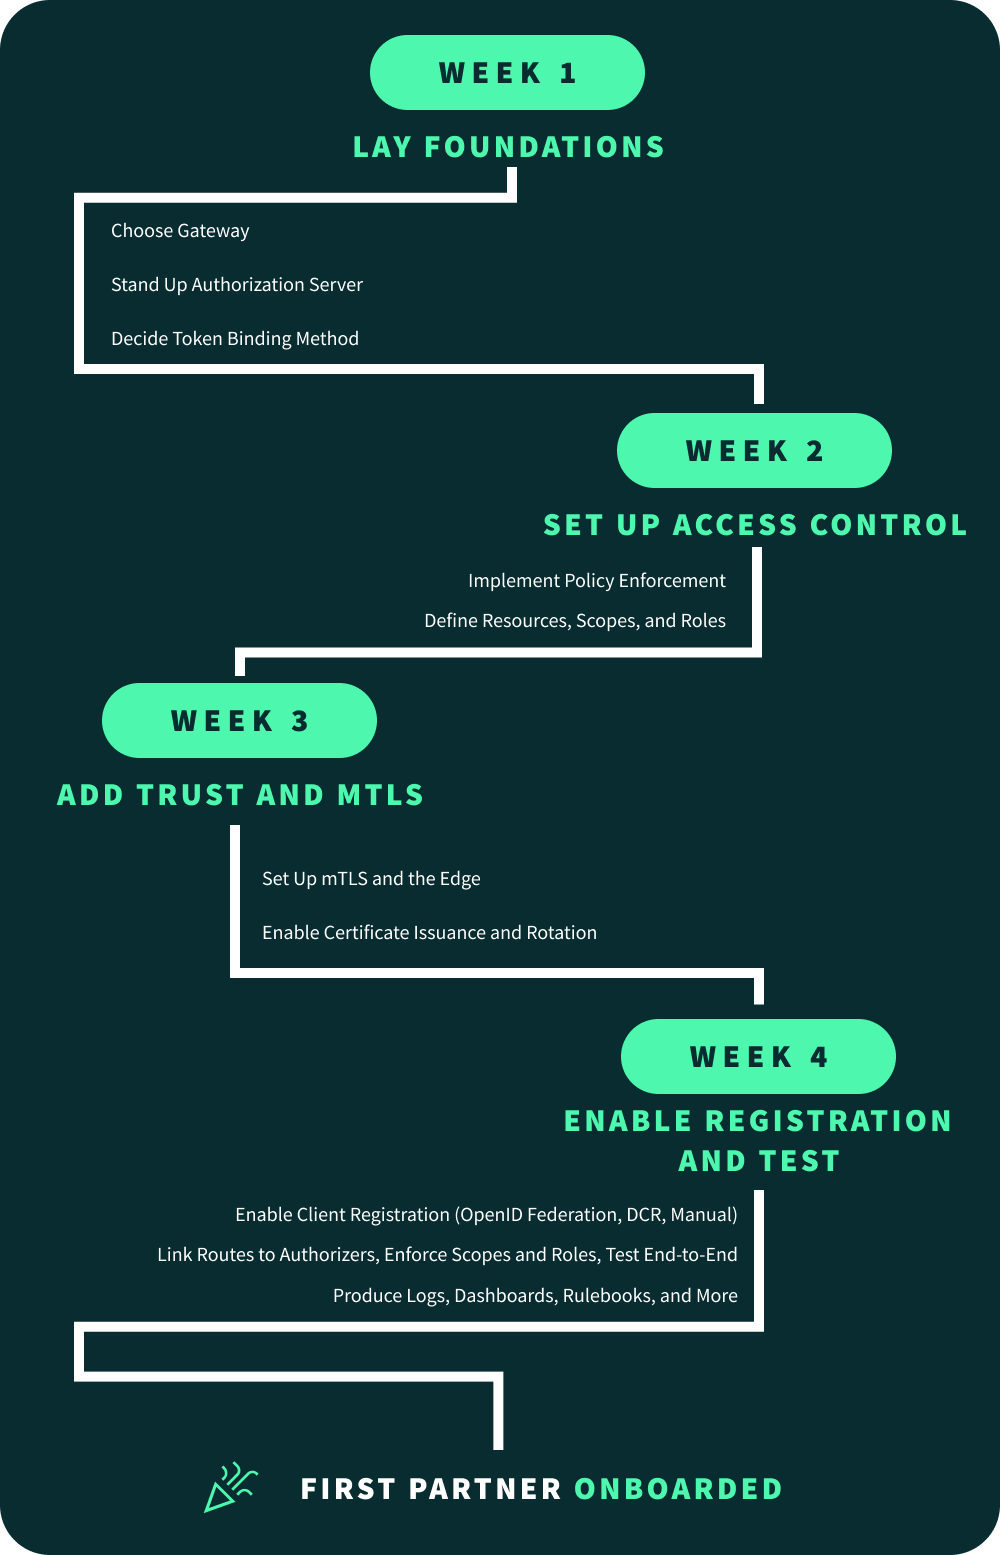
Week 1 - Foundations
-
Choose gateway (examples use AWS API Gateway HTTP API) and create dev & pre‑prod environments.
-
Stand up an Authorization Server (any standards‑compliant vendor or your own) and expose its metadata (/.well‑known/openid‑configuration per RFC 8414).
-
Decide token binding method: OAuth mTLS with certificate‑bound tokens (RFC 8705) or DPoP (RFC 9449) for public clients.
Week 2 – Access Control
-
Implement a policy enforcement Lambda authorizer (JWT validation + fine‑grained policy decisions).
-
Define resources → scopes → roles; publish a partner‑facing “access catalog”.
Week 3 – Trust & mTLS
-
Set up mTLS at the edge (API Gateway custom domain truststore) or via NGINX reverse proxy.
-
Put in place certificate issuance/rotation.
-
Bind tokens to mTLS certificates or using DPoP.
Week 4 – Registration & Testing
-
Enable client registration (OpenID Federation, manual, Dynamic Client Registration per RFC 7591)
-
Link routes to authorizers, enforce scopes/roles, and run the end‑to‑end test plan (positive & negative).
-
Produce operational docs: logging, dashboards, rotation, runbooks, partner playbook.
Reference Architecture
The reference architecture connects partner apps via mTLS and certificate-bound tokens through an API Gateway, backed by a Lambda authorizer enforcing scopes and roles. A central trust framework aligns organisations, clients, and APIs with PKI, while an Authorization Server issues standards-compliant tokens, ensuring secure, auditable API consumption.
-
API Gateway HTTP API supports JWT and Lambda authorizers; custom domains enable mTLS.
-
Lambda authorizer returns an IAM policy (Allow/Deny) + context to the backend.
-
mTLS termination at the gateway with an S3‑hosted truststore; clients present X.509 certs.
Step 1: Expose API Through Gateway
Step 1 establishes the foundation: deploy your API behind a gateway, ideally with a custom domain. Configure TLS 1.2+, disable default endpoints, and enable mTLS using a truststore. This ensures every call originates from a trusted client certificate, enforcing strong perimeter security and standardised access.
Decisions
-
HTTP API vs REST API: HTTP APIs are faster/cheaper for common patterns; both support mTLS on custom domains.
-
Use a Regional custom domain, TLS 1.2+, and disable default endpoint if you must force traffic through your mTLS domain.
Quickstart (AWS CLI Example)
# Create custom domain with mTLS (HTTP API)
aws apigatewayv2 create-domain-name \
  --domain-name api.example.com \
  --domain-name-configurations CertificateArn=arn:aws:acm:... \
  --mutual-tls-authentication TruststoreUri=s3://bucket/truststore.pem
Attach base path mappings and DNS.
Common pitfall: 403 Access Forbidden with mTLS on, usually means your
client cert isn’t chained to a CA in the truststore—re‑check the CA bundle and
chain.
Step 2: Set up Access Control via a Policy‑Enforcement Lambda
Step 2 involves validation of some key variables, to ensure secure access. These include (but could be expanded on):
-
The token origin, via the signature applied to the token
-
Any policy-related metadata, including scopes
-
The alignment of the client certificate to the client identity
This can be achieved with a policy-enforcement Lambda authorizer. It validates JWTs against the Authorization Server’s JWKS, checks expiry, issuer, and audience, then enforces required scopes or roles per resource. Optionally, it inspects the client certificate from mTLS, ensuring fine-grained, auditable authorization at the gateway before requests reach backend services.
Use a REQUEST Lambda authorizer to:
-
Verify the access token (JWT signature,
exp,aud) against JWKS. -
Enforce RBAC/ABAC by mapping routes/resources to required scopes/roles.
-
(Optional) Extract mTLS certificate identity from the request context and add it to the policy context.
Authorizer Skeleton (Node.js Example)
// npm i jsonwebtoken jwk-to-pem
const jwt = require('jsonwebtoken');
const jwkToPem = require('jwk-to-pem');
// cache JWKS (fetch on cold start) or use your AS SDK

exports.handler = async (event) => {
  const token = (event.headers?.authorization || '').replace(/^Bearer /i, '');
  if (!token) return deny('anonymous', event.routeArn, 'missing_token');

  // verify JWT (issuer, audience, expiry)
  const { header } = jwt.decode(token, { complete: true }) || {};
  const pem = jwkToPem(await getJwk(header.kid));
  let claims;
  try {
    claims = jwt.verify(token, pem, { algorithms: ['RS256'], issuer: ISSUER, audience: AUD });
  } catch (e) { return deny('unknown', event.routeArn, 'bad_token'); }

  // RBAC: route -> required scopes
  const required = requiredScopes(event.rawPath, event.requestContext.http.method);
  if (!hasAllScopes(claims, required)) return deny(claims.sub, event.routeArn, 'insufficient_scope');

  // Optional: capture client cert subject from mTLS for downstream audit
  const certSubject = event.requestContext?.identity?.clientCert?.subjectDN // REST payload
                   || event.requestContext?.authentication?.clientCert?.subjectDN; // HTTP payload
  const ctx = { sub: claims.sub, scopes: (claims.scope || claims.scp), certSubject };

  return allow(claims.sub, event.routeArn, ctx);
};

// return IAM policy per AWS format...
The authorizer must return an IAM policy with principalId and policyDocument.
For HTTP APIs you can also use a JWT authorizer that validates tokens directly in API Gateway; keep the Lambda authorizer for advanced, context‑rich decisions.
When selected as an option, Raidiam Auth includes a bundled policy enforcement lambda function, which validates all appropriate security variables. See here for more information on how Raidiam has implemented this.
Step 3: Configure Trust Framework
The trust framework acts as the backbone for onboarding organisations and client applications. It provides a directory of accredited participants, PKI for certificate lifecycle, and policies governing access. To simplify and scale partner onboarding, OpenID Connect Federation should be the preferred route for client application registration.
OpenID Federation (Preferred)
-
Each participant publishes an Entity Configuration (self-signed JWT at /.well-known/openid-federation), which links into a trust chain verified up to one or more trusted anchors.
-
Metadata policies (e.g. allowed grant types, token endpoint auth methods, redirect URI patterns) are applied automatically as chains are resolved, ensuring only compliant configurations are accepted.
-
Once validated, the application is automatically registered with the Authorization Server via the federation_registration_endpoint, and roles/scopes are bound according to pre-defined policy.
-
Trust anchors can enforce sectoral or regulatory requirements (e.g. FAPI profiles, sender-constrained tokens, proof of accreditation via trust marks).
Dynamic Client Registration (Alternative)
-
Where federation is not yet supported, OAuth 2.0 Dynamic Client Registration (RFC 7591) or OIDC Dynamic Client Registration provides a programmatic way for partners to register applications.
-
Clients POST metadata (redirect URIs, grant types, token endpoint auth method, JWKS, requested scopes) to a registration endpoint.
-
Registration may be subject to approval workflows or constrained by server-side policy (e.g. restrict to tls_client_auth or private_key_jwt).
Why Federation First
Federation removes manual configuration, eliminates reliance on static software statements, and makes accreditation a baked-in part of the registration process. By anchoring trust at a higher level, ecosystems can onboard hundreds of partners without duplicating policy checks—while retaining the option to support DCR for environments where federation adoption is still emerging.
Raidiam’s Connect product comes as a complete Trust Framework capability, and supports both OpenID Federation and Dynamic Client Registration protocols. See the Registration Frameworks article for a comparison of the two approaches when implemented through Raidiam Connect.
Step 4: Implement mTLS Termination
Step 4 secures the transport layer with mutual TLS (mTLS). Configure termination at the API Gateway or via a reverse proxy such as NGINX (there are other options, for example HAProxy, Envoy Proxy etc.), enforcing TLS 1.2+ and validating client certificates against a trusted CA bundle. This guarantees only authenticated clients reach your APIs, providing cryptographic identity and replay resistance.
Option A — At API Gateway
-
Create a custom domain; upload a truststore (PEM bundle) to S3; enable mTLS; enforce TLS 1.2+.
-
Client certificate identity can be surfaced to authorizers/backends via request context and mapping variables.
Option B — With NGINX as Network Proxy
server {
  listen 443 ssl;
  ssl_certificate     /etc/nginx/tls/server.crt;
  ssl_certificate_key /etc/nginx/tls/server.key;

  ssl_client_certificate /etc/nginx/tls/partners-ca-bundle.pem;
  ssl_verify_client on;                # require client cert
  ssl_verify_depth 3;                  # as needed

  # Optional: OCSP and logging of client cert details
  ssl_ocsp on;                         # see docs
  log_format mtls '$remote_addr $request '
                  '$ssl_client_s_dn $ssl_client_fingerprint $status';
  access_log /var/log/nginx/mtls.log mtls;

  location /api/ {
    proxy_set_header X-Client-Cert-Subject $ssl_client_s_dn;
    proxy_set_header X-Client-Cert-Fp      $ssl_client_fingerprint;
    proxy_pass https://api-gateway.example.com;
  }
}
Key directives: ssl_client_certificate, ssl_verify_client, and useful
logging variables like $ssl_client_fingerprint.
Client Testing (cURL)
curl --cert client.crt --key client.key https://api.example.com/health
The --cert/--key flags present the client certificate and key for the TLS handshake.
Learn more:
Step 5: Define Policy Attributes (Scopes & Roles) Aligned to Resources
Step 5 defines scopes and roles that map directly to your API resources and operations. Scopes represent granular permissions (e.g. accounts.read), while roles bundle them for ease of assignment. Embedding these into tokens ensures least-privilege access, aligns security policy with business logic, and supports clear, auditable authorization decisions.
Pattern
Scopes describe what can be done to a resource (accounts:read, payments:submit).
Roles are bundles of scopes tied to organizational duties (e.g., partner_reader → accounts:read).
JWT Format Guidance
Use access tokens as JWTs and include authorization claims per the JWT Access
Token profile (RFC 9068). Many systems serialize scopes either as a
space‑delimited scope string or an array in scp. Be consistent on both AS and
resource server sides.
Mapping Table (Example)
| Resource | Operation | Scope | Default Role(s) |
|---|---|---|---|
| /v1/accounts | GET | accounts:read | partner_reader |
| /v1/accounts | POST | accounts:write | partner_writer |
| /v1/payments | POST | payments:submit | partner_writer |
| /v1/reports/ | GET | reports:download | partner_analyst |
Real‑world pitfall: Broken object (or property) level authorization—always check resource ownership and minimize properties returned. (OWASP Foundation)
Step 6: Enable Registration of Client Applications (with Roles)
Step 6 enables client application registration, with OpenID Connect Federation as the preferred method and Dynamic Client Registration (DCR) as the alternative. Federation automates onboarding through trust chains, policy enforcement, and optional trust marks, ensuring only accredited apps are accepted. Where federation isn’t supported, DCR provides a controlled, standards-based fallback
Goal: allow partner apps to register, receive credentials, and be granted roles and scopes you defined in Step 5.
Three viable patterns: pick 1, or combine 1 + 2 / 3
OpenID Connect Federation (Automated Trust + Registration)
When to Use
You anticipate many partners and want automated, policy‑driven onboarding with cryptographic trust and certificate-based authentication. This presents the best option to future-proof infrastructure for scale, but retain flexibility in the attributes assigned to organisations and their clients.
What It Is (In Brief):
OpenID Connect Federation 1.0defines how entities (Authorization Servers, Relying Parties/clients, intermediates) publish Entity Statements (signed JWTs) and build a Trust Chain up to a Trust Anchor. Policies and (optional) trust marks are applied along that chain.
Key Building Blocks
-
Entity Configuration (self‑issued JWT) published at:
https://<entity_id>/.well-known/openid-federationwith federation keys, metadata, andauthority_hints. -
Trust Chain rules: each statement is signed by keys of the next entity up to the Trust Anchor; the chain is verified before using metadata.
-
Metadata Policy operators (e.g., one_of, subset_of, default) let the federation constrain client metadata such as
grant_types,token_endpoint_auth_method, and scopes. -
Registration via Federation: the OP/AS exposes a
federation_registration_endpoint; clients submit either their Entity Configuration (content‑type application/entity-statement+jwt) or a full Trust Chain(application/trust-chain+json) for explicit registration.
30‑day Implementation Path (Minimal Viable Federation):
-
Choose trust anchor(s) for your ecosystem and distribute their public keys out‑of‑band to your AS and validators.
-
Publish your AS Entity Configuration at
/.well-known/openid-federationwith federation signing keys,authority_hints, and the AS’s entity‑type metadata. -
Enable federation endpoints on the AS (e.g.,
federation_fetch_endpoint,federation_registration_endpoint) per the spec. -
Define federation metadata policy to enforce security posture: allowed
grant_types(client_credentials,authorization_code), sender‑constrainedtoken_endpoint_auth_method(tls_client_auth,private_key_jwt), redirect URI rules, and required scopes. -
(Optional) Require trust marks (e.g., accreditation assertions) as a condition of registration for high‑risk APIs.
-
Map to roles automatically: on successful resolution + policy application, bind the client to default roles (from Step 5) based on approved scopes; log the chain and policies applied for audit.
-
Test resolution: resolve a partner’s Entity Configuration, verify the chain to the trust anchor, then POST an explicit registration request to your
federation_registration_endpoint; confirm the issuedclient_idand role bindings.
Why federation helps: It removes per‑partner manual keying, standardizes client constraints at scale, and lets you revoke or tighten policy centrally by updating trust anchors/policies—without re‑touching every client.
Dynamic Client Registration (DCR)
When to Use
You want partners (or your developer portal) to register clients programmatically, with your policy enforcing what’s allowed.
Standards:
-
OAuth 2.0 Dynamic Client Registration, RFC 7591 (generic).
-
OpenID Connect Dynamic Client Registration 1.0 (OIDC‑specific). OpenID Foundation
What it enables: a client POSTs metadata (e.g., redirect_uris, grant_types, token_endpoint_auth_method) to your registration endpoint and receives a client_id (and optionally a client_secret if the profile permits). OpenID Foundation Good practice: require signed software statements or constrain allowable values via server‑side policy (e.g., only tls_client_auth and private_key_jwt; redirect URIs under approved domains). IETF Datatracker
Data to Capture (Both Options)
-
Identity: organization, contacts, entity_id (for federation).
-
Crypto: JWKS or client certificate thumbprint; token binding mode (tls_client_auth or private_key_jwt).
-
Authorization: requested scopes; assigned roles.
-
Federation‑specific: authority_hints, trust chain evaluation result, applied policy, and any required trust marks.
Pitfalls & Safeguards
-
Stale federation keys → rotate and distribute trust anchor keys out‑of‑band; monitor Entity Configuration exp.
-
Over‑permissive registration → keep policy tight (one_of, subset_of) for grant_types and auth methods; default to sender‑constrained tokens.
-
Ambiguous entity URIs → ensure the .well-known/openid-federation path resolves for each entity you expect to join.
Step 7: Link the Authorization Server & Configure OAuth 2.0 Flows
Step 7 configures the Authorization Server so all server-to-server integrations use the Client Credentials grant with mTLS client authentication. Tokens are bound to the presented certificate, preventing misuse.
For delegated access (flows involving users), enforce Authorization Code + PKCE.
Publishing discovery metadata ensures interoperability while enforcing mTLS guarantees cryptographic trust and least-privilege access.
Primary Flow (Server-to-Server)
Client Credentials Grant with mTLS authentication (RFC 8705): All machine-to-machine integrations must authenticate using mutual TLS. The AS binds the issued token to the presented client certificate via the cnf claim, ensuring the token is unusable without the matching certificate.
Optional Flow (User-Delegated)
Authorization Code + PKCE: For cases where a human user grants consent, such as third-party apps accessing end-user resources.
Configuration Steps
-
Publish AS metadata at
/.well-known/openid-configuration(RFC 8414) for automated discovery. -
Enforce
tls_client_authorself_signed_tls_client_authas the only accepted client authentication methods for server-to-server apps. -
Integrate the AS with the API Gateway or Lambda authorizer, ensuring both the token and the client certificate are validated on each call.
Why It Matters
Requiring mTLS for confidential clients eliminates weak shared secrets, ensures cryptographic binding between tokens and clients, and delivers high-assurance, least-privilege API access.
Step 8: Mint Certificates & Manage Credential Lifecycle
Client credentials underpin secure API access, and the most robust approach is to issue and manage them through Raidiam Connect’s embedded PKI. Connect automates the creation, distribution, rotation, and revocation of certificates, ensuring every client has a unique cryptographic identity tied to its registered application. Certificates are policy-bound (validity periods, rotation cycles, and revocation triggers) and centrally auditable, providing a “kill switch” if compromise occurs.
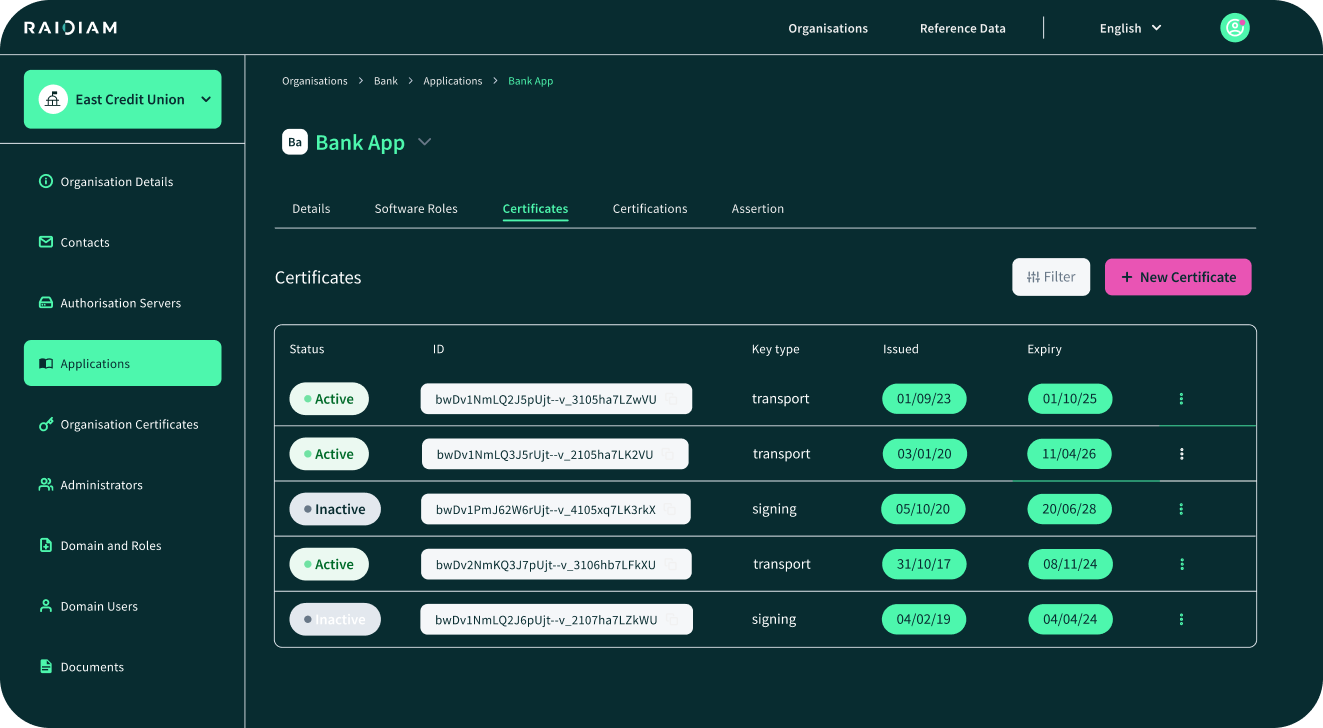
Primary Option — Raidiam Connect PKI
-
Self-service certificate minting during client registration.
-
Automated rotation policies (e.g. 90 days).
-
Centralised revocation with instant ecosystem-wide effect.
-
Audit trail of all certificate lifecycle events.
Alternative Options
-
Private CAs for organisations already invested in their own CA infrastructure.
-
OpenSSL/ACME for development or lightweight environments where enterprise-grade PKI isn’t required.
Best Practices
-
Track fingerprints and expiry dates centrally.
-
Automate rotation (e.g., 90-day validity) and alert partners 30 days before expiry.
-
Enable revocation (via JWKS, CRL or OCSP) and propagate immediately to the API Gateway truststore.
Why It Matters
Using Connect as the certificate authority ensures interoperability, enforces uniform trust across the ecosystem, and reduces operational overhead while maintaining compliance with standards like FAPI and PCI DSS.
→ Learn more about managing the certificate lifecycle in the context of PCI DSS compliance.End‑to‑End Test Plan
End-to-end testing validates that your trust and access model works as intended. Run positive flows—mTLS handshake, token issuance, and authorized API calls—and negative cases like expired tokens, insufficient scopes, or revoked certificates. Confirm instant revocation, detailed audit logs, and consistent enforcement, ensuring compliant, least-privilege, and secure API consumption.
Happy path
-
TLS & mTLS: Connect with valid client cert; expect 200 on /health. (curl --cert/--key).
-
Token flow: Obtain token (mTLS or DPoP); call /v1/accounts expect 200 when scopes match.
Negative Tests
-
Missing or expired token → 401
-
Valid token but insufficient scopes/roles → 403.
-
Valid mTLS cert but token not bound to cert → 401/403.
-
Use wrong client cert (not in truststore) → 403 at the mTLS handshake.
-
Broken object‑level authorization attempt (ID tampering) → ensure your policy/back‑end enforces ownership; expect 403/404.
Observability
In NGINX, log $ssl_client_s_dn and $ssl_client_fingerprint. In API Gateway,
use mapping variables to record client cert DNs/fingerprints for failed mTLS.
Partner Playbook
What you’ll hand to partners:
-
Base URL and environment endpoints.
-
Client registration form/endpoint and accepted token binding (mTLS or DPoP).
-
Scopes & roles catalog and how to request additional access.
-
Certificate guide: how to create a CSR, how you issue/rotate, and how to configure their HTTP client
-
Test checklist with exact curl commands and expected results.
Security Guardrails
-
Enforce TLS 1.2+ on the custom domain; review cipher policies.
-
Sender‑constrain tokens (mTLS per RFC 8705 or DPoP per RFC 9449) to mitigate token theft/replay.
-
Adopt RFC 9068 JWT access tokens to normalize claims like
aud,scope/scp. -
Log & trace cert subject/fingerprint and token
jtifor audits. -
OWASP API Top 10: design for least privilege and strong object‑level authorization. (OWASP Foundation)
Appendices: Implementation Starters
Minimal NGINX mTLS + Forward Identity
ssl_client_certificate /etc/nginx/tls/partners-ca-bundle.pem;
ssl_verify_client on;
proxy_set_header X-Client-Cert-Subject $ssl_client_s_dn;
proxy_set_header X-Client-Cert-Fp      $ssl_client_fingerprint;
For more information, see the NGINX ngx_http_ssl_module documentation.
Lambda Authorizer - Policy Builders (JS)
const policy = (principalId, effect, resource, context) => ({
  principalId,
  policyDocument: {
    Version: '2012-10-17',
    Statement: [{ Action: 'execute-api:Invoke', Effect: effect, Resource: resource }]
  },
  context
});
const allow = (p, r, ctx) => policy(p, 'Allow', r, ctx);
const deny  = (p, r, reason) => policy(p, 'Deny',  r, { reason });
API Gateway mTLS Truststore Steps (HTTP API)
-
Upload
truststore.pem(CA bundle) to S3. -
Create/edit custom domain and set
MutualTlsAuthentication.TruststoreUri. -
Map base path to your API stage; update DNS.
OAuth 2.0 Discovery & Registration
-
Publish /.well-known/openid-configuration (RFC 8414).
-
Optional: support Dynamic Client Registration (RFC 7591)
mTLS‑Bound Tokens vs DPoP (When to Use Which)
-
mTLS: Highest assurance for server‑to‑server; operationally heavier due to cert lifecycle.
-
DPoP: Application‑layer binding for SPAs/mobile; easier distribution, strong replay defenses.
One‑Page Checklists
Go‑Live Readiness
-
Custom domain live, TLS policy ≥ 1.2, DNS verified.
-
mTLS truststore updated and tested with a valid client cert.
-
JWT authorizer or Lambda authorizer passing positive/negative tests.
-
AS metadata endpoint published; keys rotating; TTLs set.
-
Scopes/roles documented; partner access catalog published.
-
Logs include cert DN/fingerprint and token jti; dashboards and alerts configured.
Partner Day‑1
-
Partner app registered; roles assigned; credentials issued.
-
Client certificate provisioned and validated.
-
mTLS handshake verified; token request succeeds; resource access returns 200.
Real‑World Pitfalls to Avoid and How
-
Circumventing mTLS: If your default execute‑api endpoint remains enabled, a caller could bypass your mTLS custom domain. Prefer custom domains + disable the default endpoint for public access.
-
Scope sprawl: Keep scopes resource‑centric and versioned (e.g., accounts.read.v1), and bundle via roles.
-
Token misuse: With bearer tokens, leakage equals compromise—use mTLS or DPoP to sender‑constrain.
-
Weak object checks: Many incidents are BOLA/BOPLA—always verify object ownership and filter properties.
-
Certificate lifecycle debt: Track fingerprints & expiry; automate renewals
Put the Playbook Into Practice
You’ve just worked through the essential steps to get your first partner live in 30 days. From exposing your API through a gateway, to enabling mTLS, configuring scopes and roles, and streamlining client registration — you now have the building blocks of a production-grade API infrastructure.
But here’s the thing: you don’t need to do it all alone.
Raidiam Connect is the enterprise-grade API trust platform trusted by banks, fintechs, and regulators worldwide. It takes the patterns you’ve just read about–and bakes them into a ready-to-run platform:
-
Onboarding without the pain: Partners self-register, generate credentials, and rotate them without emails or spreadsheets.
-
Security you don’t have to second-guess: Built-in mTLS, certificate lifecycle management, and FAPI-certified flows — straight out of the box.
-
Compliance you can trust: Designed for environments where auditors, regulators, and security teams demand assurance.
-
Scale without re-engineering: Start with your first partner and grow to hundreds, without rebuilding your stack.
Raidiam Connect enabled us to cut partner onboarding time from weeks to near-instant — while meeting the highest security standards. - Card issuer, PCI DSS Level 1
Onboard Partners in 30 Days
Request Free Trial
You've read the playbook. Now run it.
Try Raidiam Connect for free and see how easy it is to ![]() build,
build, ![]() secure, and
secure, and ![]() distribute your APIs.
distribute your APIs.